It seems there is plenty of interest about how to make RocketDock work with two or more docks or bars. Most answers say to use additional docking programs--one for each dock you want. Or use a commercial program that offers multiple docks. I think RocketDock is excellent except I want more than one. I finally figured out how to do it!
Let's first point out that RD is licensed under the Creative Commons license and it explicitly says "You are free... to Remix--to adapt the work." And also to redistribute.
RD prevents multiple instances through the use of a mutex (a common method for this purpose). So basically what I've done is find where in the code the mutex is created (using a debugger) and apply a patch that skips where the program is exited if an existing mutex is found.
So for each dock instance that you want, make a copy of the RD folders (containing the patched RocketDock.exe) and use the option to write settings to the .ini folder as described at http://www.askvg.com/how-to-create-portable-version-of-rocketdock-for-u….
Edit 2014-10-19
The steps are...
(if you use the entire zipped folder in the zip attachment, you can skip to step 4)
- Follow the instructions for creating a portable version of RocketDock (here), which are basically...
- Download and install RocketDock (rocketdock.com). Note that since we are writing to an .ini file in the installation folder, you MUST install somewhere that allows writing to files. That means, you CANNOT install in the normal C:\Program Files or C:\Program Files (x86) folders. Well, OK, there is an exception... if you run the exe as administrator, it will still be able to write to the ini file. If you don't know what that means, just install it to something like C:\RocketDock.
- After installing, run RocketDock and customize it as you desire.
- After customizing, go into Dock Settings (right click on the dock and select Dock Settings...)
- Under the General category, enable the option "Store settings in a portable INI".
- Close the dock (right click on the dock and select Quit).
- Copy the entire folder to some other location, let's say C:\RocketDock_bottom.
- Uninstall the first location.
- At this point you should be able to run the RocketDock.exe file from your second location and have the bar appear.
- Close any running instances and replace the original RocketDock.exe (dated 2007-09-02) with the the patched version on this web page (dated 2012-11-10).
- (You can start here if you use the entire zip file attached, which is the contents of a RocketDock installation folder... extract it into a folder)
For each additional dock that you want, do the following.- Copy the folder again and rename it (for example, C:\RocketDock_top).
- Run RocketDock.exe and change the settings so it appears where you want it.
- Close the dock and ensure that a file "Settings.ini" was created in the proper location's folder and the file has the correct modified timestamp (whatever time you click OK on RocketDock's settings page).
- Alternatively to B and C... Edit the ini file directly. Look for the key "Side" and change the value to the number corresponding to where you want it: Top=0; Bottom=1; Left=2; Right=3.
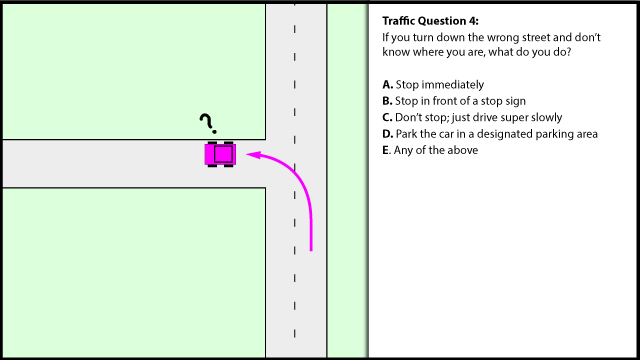
 Traffic Question 5: